Ethernet or FireWire
 If you want just a temporary arrangement for sharing files between two computers, a direct cable connection can be the fastest method. With this setup, you manually configure the computers' IP addresses, since you have no DHCP (dynamic host configuration protocol) server to create the connection automatically.
This technique uses an ethernet or FireWire (IEEE 1394) cable. The benefit of choosing this method over a Bluetooth or Wi-Fi connection is that it allows fast transfers of big files. But both cables have limitations. FireWire connections work only on Windows XP, not Vista. (You can use FireWire to network an XP machine and a Mac, however.) And ethernet requires a crossover cable or another piece of hardware, either a hub or a switch. The crossover cable will likely be labeled as such; otherwise, most ethernet uses straight patch cables. (Look for "patch" or "crossover" on the cord.) I like to have a short FireWire or crossover cable on hand, even when I'm traveling; it has saved my bacon on a few occasions.
Once you have connected the cable between the two PCs, here's how to start sharing.
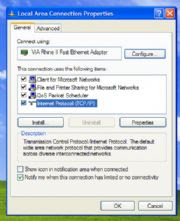
Open the Network Connections Control Panel. Right-click your connection, such as Local Area Connection, and click Properties. Select TCP/IP, and choose Properties. Click Use the following IP address and enter 192.168.0.1 as the IP address and 255.255.255.0 as the subnet mask. Leave the other details blank and click OK. Close the dialog boxes until you return to the Network Connections Control Panel. Repeat the process on the second PC, but set its IP address as 192.168.0.2. You've just created a network of two computers.
Share the Internet Over a Wired Connection
 If you have more than one connected port, you'll see a drop-down menu here. Otherwise, just check this box. Internet Connection Sharing (ICS) allows an online PC to pass its connection to an offline computer. You could use this arrangement to share a Wi-Fi signal in a hotel or airport across ethernet, to pass your 3G mobile broadband connection along to a nearby colleague, or to otherwise let another PC mooch a live Internet signal.
The process uses two different network connections: the one that goes to the Internet and the one that leads to the second PC. So you can't pass along a Wi-Fi signal via Wi-Fi; you'll have to use another plug. And if you're directly connecting two PCs via ethernet, you'll still have to use a crossover cable, instead of a standard patch cable.
Connect the host computer to the Internet as you normally do, such as through Wi-Fi, ethernet, or a mobile broadband adapter. You'll rarely set up this kind of temporary sharing at home or your office; but if you do, be sure that your router's IP address is configured to a subnet other than 192.168.0.x. For example, change the 0, setting the router to 192.168.2.1. (The process varies by router brand; consult your documentation.) Windows wants to take over that 192.168.0.x subnet, and will likely report errors if it can't.
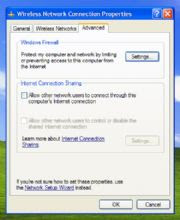
In the Network Connections Control Panel, right-click the connection that takes the PC online, and pick Properties. Under the Advanced tab, click the Allow other network users to connect through this computer's Internet connection check box. If necessary, in the drop-down menu, select the method used to bridge to the client computer, such as 1394 for FireWire or Local Area Connection for ethernet. (If you don't have extra ports, you won't need to pick one.) Click OK.
Verify that the client computer is set to automatic configuration. Open the Network Connections System Preference. Right-click the connection that goes to the host PC, such as 1394 for FireWire or Local Area Connection if you're using a crossover ethernet cable between the two machines. Click Internet Protocol (TCP/IP) and choose Properties. Click the Obtain an IP address automatically radio button. That's it--both computers can now get online.
Connect Two PCs on an Ad Hoc Wi-Fi Network
 Temporary Wi-Fi connections are slightly different from their wired counterparts because they can reach many computers. You configure the host PC to act as a wireless router, letting other PCs join as they normally would to dedicated hardware. This setup can share files or bridge a wired Internet connection--such as in a hotel room--to wireless friends.
Most Wi-Fi-equipped PCs include a networking utility from the Wi-Fi hardware (or chip) vendor. You can use that tool to configure the ad hoc network; since they vary, however, I'll explain the process within the Windows Control Panel. But first, open your specific utility, and be sure that it's set to allow Windows to configure the hardware.
Open the Network Connections Control Panel. Right-click Local Area Connection, and click Properties. Choose the Advanced tab, and click the first Internet Connection Sharing check box to allow other network users to connect. Click OK.
In the Network Connections Control Panel, right-click Wireless Network Connection and select Properties. Click the Wireless Networks tab, and click Add. Enter a name--I named mine Adhocshare--and check the box at the bottom that says it's a computer-to-computer network. Uncheck the box that says the key is automatically provided. If you want to use a password to access the network, change the settings in the Network Authentication drop-down menu. Click OK.
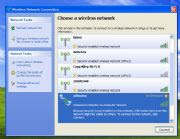
Double-click the icon for your wireless adapter in the Network Connections Control Panel. Click View Wireless Networks, and then choose the name of the ad hoc network. Click Connect. At that time, on the client computer, open the Network Connections Control panel and double-click the Wireless Network icon. Click View Wireless Networks, highlight the ad hoc network, and click Connect. Enter the password details you've set, if necessary.
You can now share the Internet and transfer files between one or more client computers. Just as with other ICS methods, Windows assumes that you are not using a home router; if your wired connection is on the 192.168.0.x subnet, the process might not work because the host computer configures clients using those addresses.
Want more Wi-Fi tips and tricks? See "12 Downloads to Make Your Wi-Fi Life Easier and More Fun."
Share Files on Your Temporary Network
You might have to disable the Windows Firewall temporarily. Otherwise, you should see the networked computer listed here. Once you have two PCs talking--with or without a shared Internet connection--they can transfer files. Here's how to activate that service.
Navigate to the folder you want to share, right-click it, and pick Sharing and Security. Choose Share this folder on the network, and then click Apply. (If you don't see that option, first click the second 'Network Sharing and Security' option, acknowledging the security risks and skipping the wizard.)
On the client computer, choose Start, My Computer, and click My Network Places. Click Add a network place. Click Next twice, approving the Choose another network location option. Click Browse, and then expand Entire Network, Microsoft Windows Network, and Workgroup, until you see the host computer. Select the shared folder, and click OK and Next until you finish.
The client computer can now copy the shared files off the host. If your group needs to be able to upload, or to edit directly on the host, click the Allow network users to change my files box when you create the shared folder.
Send Files Easily via Bluetooth
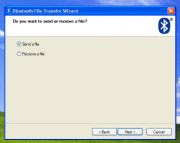
 Click to send or receive--it doesn't get any simpler. If your PC has Bluetooth, it likely also has Wi-Fi, so you may be asking why you should bother sending files via Bluetooth. In fact, it's amazing how simply and easily this oft-overlooked wireless protocol transfers documents between laptops; you can set it up and fling files in seconds. Its biggest drawback is that it's relatively slow for transferring larger files; recently I had to wait more than 2 minutes to send a 5MB file. But Bluetooth makes sense for many mobile devices, too, especially for getting photos off of cell phones. Here's how to use Bluetooth to transmit files.
On the Bluetooth-enabled PC where you want to receive a file, open the Bluetooth File Transfer Wizard. (Look in the Accessories, Communications folder.) Click the radio button labeled Receive a file and then click Next.
On the PC from which you'll be sending a file, open the same wizard, choose Send a file, and click Next. (Or jump-start the process by right-clicking a file and picking Send To, Bluetooth device.) Choose Browse, and select the other PC. Usually I skip the passkey process for simplicity. (If you use a passkey, you'll have to enter the same code on each device to authenticate the transfer.) Click Next, and select the file to transfer. Click Next again.
You can send files from cell phones or other devices in the same way; you don't need to go through the detailed pairing process first. Just set the PC to receive a file, and send from the device. The process will vary, but when you're looking at a file, an options menu will often begin the transmission.


2 comments:
Friday, September 18, 2009 12:24:00 AM
Thanks for this information.
I think Connecting two computer's without a switch or hub, needs a Cross cable and not a straight cable. Also try to crimp the RJ45 connectors again, seems a bit loose. Also give only IP address and subnet mask, Gateway is not required. Will not do any harm but still.
jeux
Saturday, September 19, 2009 12:59:00 PM
Some of the technique mention above can connect two or more pc without cross-wire
Thanks 4 observation
Post a Comment